Friday, January 14, 2011

April's stool

Another one of April's projects. She brought me this stool, which looked like it was an old shoe shine stool. It had layers and layers of paint that was chipping and it was a dirty tan color. The top was covered in leather, old leather that was cracked and worn.

Photobucket

The majority of the work was just prepping it, sanding it and removing the top, which was strongly nailed down. The original plan was to paint it white and distress it. But after sanding it down, I sent April a picture of it. I know she likes the old distressed look and the multiple layers of paint showed through in muted yellows, creams and blue/greens. I liked it! And she did too...so I sealed it well with a few coats of poly. Then I took plush batting and burlap to replace the top, and attached it with antique brass nailhead trim. Here it is...

Photobucket

Photobucket

Photobucket

Photobucket

Photobucket

Photobucket

Friday, December 17, 2010

April's bench

The weather has gone from mild to freeeeezing...we just had some snow yesterday! I love the snow though and am hoping we have some for Christmas. But this weather makes painting almost impossible. I have tried to work out in my garage, even sanding a bit, but my hands didn't last long. I did this next project mostly inside...and just did the sanding and finishing touches outside.

April found this cool bench at a tag sale.

Photobucket

She wanted the legs turquoise and the top whitewashed. I first sanded off some of the green paint and then painted the turquoise right on. I opted to skip the primer because I didn't want the white showing through. Then I distressed the legs and added antiquing glaze. For the top, I just lightly sanded and added my whitewash (which is just watered down white paint). I painted it on and then rubbed it in with a clean rag.

Photobucket

Photobucket

Photobucket

Photobucket

Tuesday, November 30, 2010

Kelly's desk

Pheeeew, it's been awhile. The holidays are here and it's been busy! And, yes, I've done a few little projects that I totally forgot to take pictures of and just let slide by...oh well.

BUT, this project has probably been my favorite so far. The color probably has something to do with that! My sister, Kelly, acquired this great desk for FREE from her mother-in-law. When I got it, I sanded it down and it looked like this...


Photobucket

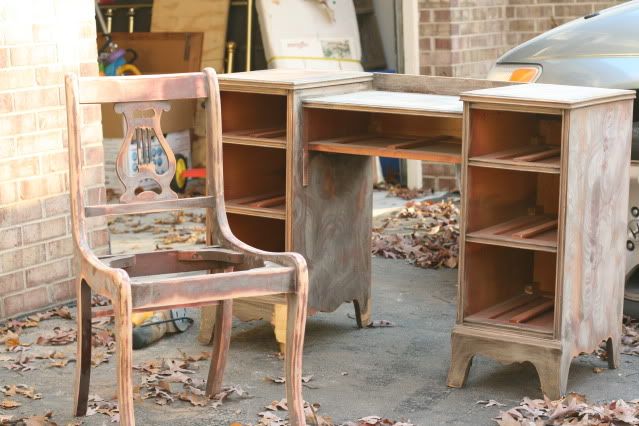
It actually was in pretty bad shape. I had to do some repairs to it. It either was really cheaply made or has just been really loved over the years. A good part of the desk is veneer, which half was peeling off. So, I had some glueing to do, among other things.

My sister deliberated long and hard over the color. And she scored big on this one! She chose *cloud burst* by Behr. I absolutely love it! In fact, it's my new favorite paint color for now. I've already been thinking of what I can paint this color to put in my house.

I love the antique hardware that was on the desk. And thankfully, none of it was missing. Originally my sister thought she wanted to paint the hardware black. But I held off to see how it would look once the desk was done. And now I think the antique patina of the hardware is perfect for the desk and it's color. But, Kelly, I'll still paint the hardware for you if you like!

Here's the desk all done and happy in my sister's dining room...

Photobucket

Photobucket

Photobucket

Photobucket

I found some fabric in my stash for the chair that matched perfectly and picked up the other colors in my sister's house.

Photobucket

Although the desk doesn't quite fit as well as Kelly thought in the spot she had picked out, I hope she at least enjoys looking at it and marveling at what a great color she chose. Well done, Kel!

As for how I did the desk, I sanded, primed and painted. Then I lightly sanded the edges, giving a little more attention to the *more used* areas like the back of the chair and front top of the desk. After that I rubbed it all over with antiquing glaze.

Tuesday, November 16, 2010

*Count Your Blessings*

I found this idea recently as I was searching for some painting ideas. I loved it as soon as I saw it and knew it would be a great reminder and practice to start with the girls, especially with the holidays coming up. So, I created our own *Count Your Blessings* chart. We regularly go over and start a new list of all the things that we are grateful for on that given day.

It was very easy to do... I took a red frame that I had laying around, painted it and then put a burlap background inside and got cheap letter and number stickers at Michaels. We also picked up some window markers there which are fun and easy to use. And they just wipe right off the glass when you want to make a new list.

I'm thinking this would also make a great shopping list, to-do list, honey-do list, menu, or a memory verse that your family is working on. I like that it's practical and useful, but also decorative and not an eye sore on the wall.


Photobucket

Photobucket

Photobucket

Saturday, November 13, 2010

April's side tables

April has been keeping me busy! Last week I refinished 2 side tables for her. Her style is eclectic and she has been adding some things recently that are very very distressed. She actually wanted these tables looking older than when I got them. Here they are before:

Photobucket

Both of them I painted and then took my palm sander to give them a good roughing up. The shorter table April told me she wanted to have less paint then wood showing! After painting I applied both stain and antiquing glaze.

Photobucket

Photobucket

Photobucket

The tall table I distressed almost the same way.

Photobucket

Photobucket

Photobucket

And that's all folks! I have another project I can't wait to post about...something a little unusual to what you've been seeing. That will be next. And then I've got another custom order desk I'm also working on. Stay tuned!

Wednesday, November 3, 2010

April's coffee table

I've been working on a number of other custom order pieces for April. The first one was a coffee table. A new trend that I have seen around lately is the combination of an old wood look with aged metal. She picked up this table at a tag sale a few weeks back. It was the real deal - authentic raw wood and very aged, rusty iron. An aside note...ironically, she dropped it off right after my husband, Dave, had just accepted a job at IBM and imprinted in the wood says, "Property of IBM Corp." I'm not sure what it was used for, but it was obviously owned by IBM at some point and looks as if it has been around for many a day. It's a very cool piece. This is what it looked like when I got it.

Photobucket

April actually loved the piece the way it looked. However, it had layers upon layers of of paint, rust, and other things I didn't recognize on the metal and with little ones, you have to be careful with lead. So, I suggested that we re-do the legs and whitewash the top (brighten the wood and highlight the natural wood grain). I worked on the legs, sanding and using a wire brush to get all the loose stuff off and a bit of rust. I then primed it with a spray and used 2 different metallic paints on it. (My new favorite silver color is Krylon Satin Nickel). After this, I had to figure out a way to distress the legs to get them to look similar to the way it was originally. I sanded them heavily, used my beloved antiquing glaze and two types of stain...a walnut color and a cherry (to add a slight look of rust). Finally I white washed the wood on top. When I was done, my husband commented..."it doesn't look much different." I guess that's a good thing. I really liked it and I think my new favorite paint technique is white washing...I hope to try it out more in the future. Here is how she turned out.

Photobucket

Photobucket

Photobucket

Photobucket

Photobucket

Photobucket

Tuesday, October 26, 2010

Alicia's desk

I had fun (and learned some) with this very neat piece. This desk was originally owned by Alicia's mom and was passed down to her awhile back. It has been well loved over the years!

Photobucket

Photobucket

Alicia wasn't quite sure at first what color to paint it. She liked the idea of a fun, subtle color, but at the same time wanted it to be neutral. We decided on a creamy white. After we first talked I threw out the idea of painting the inside gray, a color that she had been thinking about. It would add some interest to the desk while in use, but also allow it to go in any room, since you could close it up and hide the gray away. After sanding, priming and painting, I distressed it and then used an antiquing glaze, which enhanced all the details of the desk.

It was not until I was all done and the desk was settled into it's home, that Alicia found these wonderful amber glass knobs from Restoration Hardware. I think they are perfect!

Photobucket

Photobucket

Photobucket

Photobucket

Photobucket

Photobucket

Photobucket

Photobucket